Crossing The Data Drop Chasm-Revit To Excel and Back Again Using Dynamo
- Bill Allen

- Jan 24, 2023
- 3 min read
It is sometimes desirable or necessary to push data from Revit to Excel, and back again. One such example I can think of is when working with a door hardware consultant.

The door hardware consultant may not have access to Revit, little lone your Revit model. You have a few options. You could export your data to Excel, have him/her populate it, and then re-enter the data once it is back in Revit OR you could export it to excel using Dynamo, and then re-import the data from excel to Revit.
It's worth mentioning that you want to be very intentional about how and when you complete these tasks. For example if you export your data, and add/remove a door, this information will be lost in translation with your door hardware consultant.
Exporting Revit To Excel

All Elements of Category paired with Categories pulls all the elements that exist in your model.

Next, we want to pick which parameters from the elements to export. To do this we will use the "Element.GetParameterValueByName" node. I'm also using the "Element.Id" so I can match the components and their data with the unique Element.Id.

List.Create allows you to take multiple streams of data and combine them. This is important as the Revit to Excel node later will be receiving one stream of data.

List.Transpose flips data. It makes rows columns and columns rows. If you are a grasshopper user, this does the same thing as "Flip Matrix" in grasshopper.

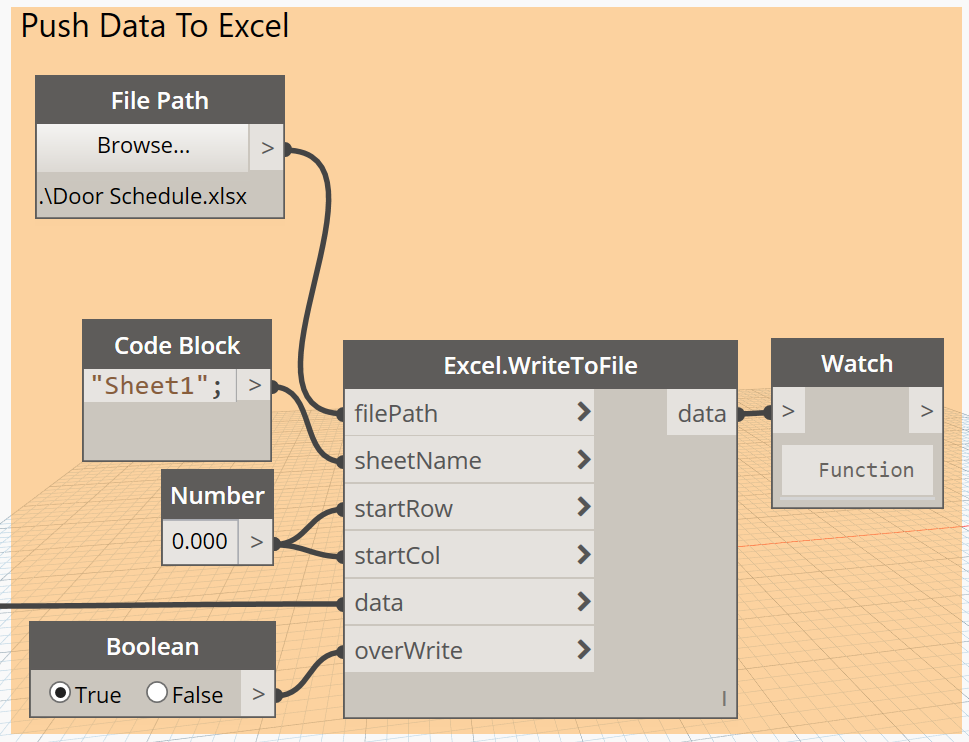
Excel.WriteToFile is AMAZING. This node is where the magic happens. We have a few inputs to match up. Where is the File located? What is the sheet name? Which Row/Column do you want to start with? Overwrite data that exist?

Here is the result! Now to email the hardware consultant! ;)

Push data from Excel to Revit
Here is the full script for importing the data from excel back into Revit.

Importing the data from Excel into Revit begins with the "Excel.ReadFromFile" node. You will use the File Path and File.FromPath nodes to browse to your excel file. Pick which sheet you want to import from. Pick the Sheet name. One of the most important subtle check boxes that I found extremely important was the "ReadAsStrings" input. The reason this input is so important is depending on if your Revit parameter name is a number or not, you will want to be intentional about checking this true or not. Revit text parameter=True. Revit number parameter=False.

We'll be using the List.Transpose again to get convert the rows back to columns and the columns back to rows.

We'll use the List.GetItemAtIndex to choose which Excel column to grab. "0" will be the first column. "1" will be the second columns, and so on.

Finally we will want to pick which elements and parameter(s) to feed our data back into. We will be using the "Element.SetParameterByName node to populate the data. We can pair the "All Elements of Category" with the "Categories" node to grab the doors again. We are using a code block with quotes for the parameter name "Door Hardware Group". It's worth mentioning again that since our excel to revit node imported as string, we do not need to convert the data to a text string for the text parameter "Door Hardware Group". You will need to take into consideration if your parameter is number parameter or an integer parameter instead of a text parameter as you may need to use the string to number node.

And here is the Door Hardware Group populated in the Revit schedule!

Interested in growing your Dynamo ninja skills or want to host a dynamo workshop at your office? Reach out to me personally at bill.allen@evolvelab-inc.com


